
Blog, Cannabis Clones, Cultivation Techniques
14
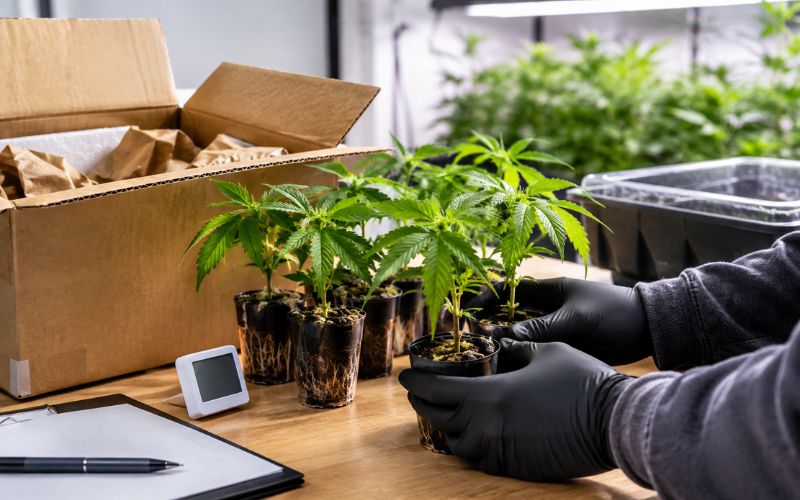
Transplanting a cannabis clone is an important step in moving a young, rooted plant from its starter container into a larger pot or growing medium. Done carefully, the process gives the developing root system more room to expand while helping the plant transition into its next stage of growth.
The key is to avoid treating transplantation as simply moving a plant from one pot to another. A clone is still developing its root system, and unnecessary root disturbance, excessive watering, sudden changes in light, or a poorly prepared growing environment can increase transplant stress.
In this guide, we’ll explain when to transplant cannabis clones, how to prepare the new container, how to move the clone without damaging the roots, and what to do during the first few days after transplanting.
Important: Cannabis cultivation is subject to federal, provincial, territorial, and municipal requirements in Canada. Health Canada advises growers to follow all applicable local laws and regulations. For non-medical home cultivation, federal rules allow adults of legal age to grow up to four cannabis plants per household, subject to provincial, territorial, and municipal restrictions.
When Should You Transplant a Cannabis Clone?
There is no single calendar day that works for every clone.
The condition of the root system is a more useful indicator than the plant’s age alone.
A rooted clone is generally ready to move when:
- The roots have developed enough to hold the growing medium together.
- Healthy roots are visible around the outside or drainage area of the starter container.
- The plant is producing new growth.
- The clone has recovered from transportation or initial propagation stress.
- The existing container is becoming too small for the developing root system.
Some growers may transplant rooted clones within a few days of receiving them, while freshly rooted cuttings may need more time to establish. The important point is to assess the actual condition of the plant rather than following a rigid schedule.
Signs Your Clone Is Ready
Look for a combination of root development and healthy top growth.
Roots: Healthy roots are generally white or light-coloured and actively developing.
Top growth: New leaves and shoots indicate that the clone is actively growing rather than simply recovering.
Root ball: When the growing medium stays together around the roots during removal, the plant is usually easier to transplant without disturbing the root system.
If the root system is still very small and the growing medium falls apart when handled, the clone may benefit from additional establishment time.
What You Need Before Transplanting
Prepare everything before removing the clone from its existing container.
Basic supplies
- Clean growing container
- Appropriate growing medium
- Water
- Clean hands or disposable gloves
- Plant label
- Clean workspace
- Optional drainage tray
The new container should already be prepared before you disturb the clone.
This keeps the roots exposed for as little time as possible.
Step 1: Prepare the New Container
Start by filling the new container with your chosen growing medium.
The medium should be appropriately moist before or immediately around the transplant process, but it should not be saturated.
Avoid creating a large, waterlogged area around a small root system.
The new container should also provide adequate drainage.
Good drainage is particularly important because excessive moisture around developing roots can create problems for young plants.
Step 2: Prepare the Planting Hole
Create a hole in the center of the new growing medium that is large enough to accommodate the existing root ball or rooting plug.
The hole should not force the roots into an unnatural position.
It is better to make the opening slightly larger than to push or compress the root system into a hole that is too small.
Before proceeding, compare the depth of the hole with the current position of the clone.
The goal is to transplant the clone without dramatically changing its original planting depth.
Step 3: Handle the Clone Carefully
This is one of the most important parts of the process.
Never pull a clone upward by its stem.
Instead, support the container, plug, or root ball.
If the clone is in a flexible starter container, gently squeeze the sides to loosen the root ball. Turn or angle the container carefully while supporting the plant and growing medium.
The less you disturb the roots, the better.
If the roots are growing through the medium or forming a cohesive root ball, avoid aggressively breaking them apart.
The existing roots are responsible for helping the plant establish itself in its new environment.
Step 4: Remove the Clone From Its Starter Container
Once the container has been loosened, gently remove the clone.
Inspect the root area while you have access to it.
You want to avoid:
- Pulling roots apart
- Crushing the root ball
- Shaking off all of the growing medium
- Breaking the main stem
- Leaving the roots exposed for an extended period
If the plant is growing in a rooting plug or cube, handle the plug itself rather than pulling on the plant stem.
The objective is to move the existing root system into the new environment with as little disruption as possible.
Step 5: Place the Clone Into the New Container
Carefully place the root ball into the hole you prepared.
Position the plant at approximately the same depth at which it was previously growing unless the growing medium or root structure requires otherwise.
Make sure the plant is upright.
Avoid pushing the root ball forcefully into the soil or compressing it excessively.
Once the clone is positioned correctly, begin filling the space around the root ball with the growing medium.
Step 6: Fill Around the Root Ball
Gently add growing medium around the clone.
The medium should support the plant without being packed excessively tightly.
You want the roots to have access to moisture and air while the plant remains stable.
Lightly settle the medium around the root ball so there are no large empty spaces immediately around the roots.
However, avoid aggressively pressing down on the soil.
Step 7: Water the Clone After Transplanting
After transplanting, provide appropriate moisture to help settle the growing medium around the root system.
The goal is to moisten the area around the root ball without turning the entire container into a saturated environment.
One common mistake is giving a small clone a large amount of water simply because it has moved into a larger container.
The root system has not suddenly become larger just because the pot is larger.
Allow the plant and growing medium to guide your watering decisions.
Cannabis Clones Canada’s existing growing guidance recommends keeping the growing medium moist rather than saturated and warns against overwatering newly transplanted clones.
Step 8: Give the Clone Time to Adjust
Transplanting can temporarily stress a plant.
For the first few days, avoid making multiple major changes at the same time.
Keep the environment stable and monitor the plant.
Avoid immediately increasing light intensity, changing several nutrients, moving the plant repeatedly, or drastically changing temperature and humidity.
The goal is to make the transition as gradual as possible.
Step 9: Adjust Lighting Gradually
A newly transplanted clone may not need the strongest possible light immediately.
If the clone was previously under lower-intensity lighting, suddenly placing it under intense light can add another source of stress.
Start with an appropriate level for the plant’s current stage and growing setup, then gradually adjust as the plant begins producing new growth.
Watch the plant rather than relying solely on a fixed light distance.
Different grow lights produce different intensities, so a distance that works for one setup may not be appropriate for another.
Step 10: Maintain Stable Temperature and Humidity
Environmental stability is particularly important after transplantation.
Avoid placing the clone somewhere with:
- Extreme temperature fluctuations
- Strong drafts
- Direct heat
- Very dry air
- Excessive humidity with poor ventilation
Indoor growing areas should have sufficient ventilation to control excess moisture and humidity. Health Canada specifically recommends adequate ventilation for indoor cannabis cultivation to help reduce mould risks.
The exact temperature and humidity targets can vary depending on the plant’s stage, growing medium, equipment, and overall environment.
How to Prevent Cannabis Clone Transplant Shock
Transplant shock can occur when the plant experiences too many changes at once.
Root disturbance is only one possible factor.
A clone may also experience stress from sudden changes in:
- Light intensity
- Temperature
- Humidity
- Water availability
- Growing medium
- Air movement
A useful approach is to make the transition gradual wherever possible.
To reduce transplant stress:
Handle the roots gently.
Avoid unnecessary root disturbance.
Prepare everything beforehand.
Don’t leave the roots exposed while preparing the new container.
Avoid overwatering.
A larger pot does not mean the plant needs more water.
Avoid excessive light immediately after transplanting.
Allow the plant to adjust before increasing intensity.
Keep environmental conditions stable.
Avoid moving the plant repeatedly between different environments.
Don’t overfeed.
Follow the requirements of your growing medium and nutrient products rather than assuming more nutrients will accelerate recovery.
How Long Does Transplant Shock Last?
There is no fixed recovery period for every clone.
Some healthy clones may resume normal growth relatively quickly, while others may need several days to adjust.
Instead of focusing only on the number of days, monitor the plant’s overall direction.
Signs of recovery include:
- Leaves becoming more stable
- New growth appearing
- Stronger stems
- Healthy leaf colour
- Increasing root development
- Normal water use
Signs that something may be wrong include:
- Persistent severe drooping
- Rapid yellowing
- Significant leaf damage
- Stem damage
- Mould
- Root deterioration
- Visible pests
- Continued decline rather than improvement
If the plant continues to deteriorate, review the root zone, moisture level, lighting, temperature, humidity, and possible pest problems before making additional changes.
Should You Transplant a Clone Immediately After It Arrives?
Not always.
If you have just received a clone, inspect it first.
A plant that has experienced transportation may need time to acclimate before undergoing another major change.
However, if the clone arrives well rooted and is already ready for a larger container, transplanting may be appropriate after inspection and initial acclimation.
The right decision depends on:
- Root development
- Plant condition
- Container size
- Growing medium
- Transportation stress
- Current environmental conditions
The goal is to avoid both extremes: transplanting too early and leaving a root-bound plant in a container that is too small for too long.
Should You Transplant Directly Into a Large Pot?
A bigger container is not automatically better for a small clone.
A small root system surrounded by a large volume of wet growing medium can make moisture management more difficult.
For this reason, many growers gradually increase container size as the root system develops rather than immediately moving a small clone into an oversized container.
Choose a container that is appropriate for the current size and development of the plant and your planned growing system.
What About Transplanting Into Outdoor Soil?
Outdoor transplantation requires additional preparation.
If a clone has been growing indoors or under controlled lighting, it should not necessarily be moved directly into intense outdoor sunlight.
Outdoor conditions can introduce sudden changes in:
- Light intensity
- Temperature
- Wind
- Humidity
- Rain
- Day/night conditions
Gradually acclimating indoor-grown plants to outdoor conditions can help reduce environmental stress.
The timing should also take into account local weather and applicable cultivation requirements.
Common Cannabis Clone Transplanting Mistakes
1. Pulling the Clone by the Stem
This can damage the stem or disturb the roots.
Always support the root ball or container.
2. Breaking Apart the Root Ball
Avoid unnecessary root manipulation.
Move the existing root system as intact as reasonably possible.
3. Using a Waterlogged Container
Excess moisture can create problems for developing roots.
Use a container with appropriate drainage and avoid saturating the medium.
4. Choosing an Oversized Pot
A large pot can hold substantially more moisture than a small root system can use.
Choose the next container based on the plant’s development and growing method.
5. Increasing Light Too Quickly
Transplanting is already a change. Adding intense lighting immediately can create additional stress.
6. Feeding Too Aggressively
Do not assume a stressed clone needs additional nutrients.
Follow the instructions for the growing medium and nutrient products you use.
7. Making Too Many Changes at Once
If a plant is struggling, changing everything simultaneously makes it difficult to identify the cause.
Change conditions deliberately and monitor the response.
Cannabis Clone Transplant Checklist
Before transplanting:
- Clone has an established root system
- New container is ready
- Growing medium is prepared
- Planting hole is the appropriate size
- Water is available
- Workspace is clean
- Plant label is ready
During transplanting:
- Handle the root ball carefully
- Avoid pulling the stem
- Keep roots from drying out
- Place the clone at an appropriate depth
- Fill gently around the root ball
- Avoid compacting the medium excessively
After transplanting:
- Provide appropriate moisture
- Keep environmental conditions stable
- Avoid excessive light intensity
- Monitor the leaves
- Check for pests or mould
- Watch for new growth
Frequently Asked Questions About Transplanting Cannabis Clones
When is the best time to transplant cannabis clones?
The best time depends more on root development and plant condition than on a specific number of days. Look for an established root system and active new growth.
How do I know if my clone is ready for a bigger pot?
Check for developing roots around the outside or drainage area of the starter container and look for healthy new growth. These are useful indicators that the plant is ready for more root space.
Should I water before or after transplanting?
The growing medium should be appropriately moist, not saturated. Depending on the medium and transplant method, growers may prepare the new container with moisture and then provide appropriate water after the plant is positioned.
How can I avoid transplant shock?
Handle the root system gently, avoid sudden environmental changes, don’t overwater, and give the clone time to adjust to its new container and growing environment.
Should I use nutrients immediately after transplanting?
Avoid assuming that newly transplanted clones need aggressive feeding. Nutrient requirements depend on the growing medium, plant condition, and products being used. Follow the relevant product directions.
Can I transplant a clone directly into its final container?
It is possible in some growing setups, but a very large container can make moisture management more difficult for a small root system. Many growers use progressively larger containers as the root system develops.
Can I transplant a clone outdoors?
Yes, where legally permitted and when environmental conditions are appropriate. However, indoor-grown clones may need gradual acclimation to outdoor light, wind, temperature, and humidity.
Why is my clone drooping after transplantation?
Some temporary stress can occur after transplantation. Check the root zone and growing-medium moisture first. Also consider whether the plant has experienced a sudden change in light, temperature, humidity, or airflow.
How long should I wait before increasing light after transplanting?
There is no universal number of hours or days. Monitor the plant’s condition and gradually return it to the appropriate light level for its growth stage rather than making a sudden increase.
Final Thoughts
Transplanting cannabis clones does not need to be complicated.
The most important part is protecting the developing root system and giving the plant a stable environment after the move.
Prepare the new container first, handle the root ball gently, maintain an appropriate moisture level, avoid sudden environmental changes, and give the clone time to establish.
A successful transplant is less about doing more and more about avoiding unnecessary stress.
If you are starting with healthy, rooted clones, Healthy Cannabis Clones provides growers with established plants and clone-care resources designed to help them understand the early stages of growing.
For Canadian growers, always confirm the current federal, provincial, territorial, and municipal rules that apply to your location before cultivating cannabis. Health Canada notes that home-growing requirements can vary by jurisdiction and recommends purchasing seeds or immature plants from legal sources.